Sunday, December 29, 2019

Tuesday, December 24, 2019

Effective Seating Arrangements

You get your new classroom key. You walk excitedly to your new room and unlock the door. Inside you see a stack of chairs and tables in the corner. So where to begin?

First things first.


You need to get your tables in an arrangement that will facilitate learning by allowing your students to see you and the board.


TEACHER DESK


The placement of your teacher's desk is important and is the first place to start. You need to be able to see the whole classroom and have access to storage.


Some things to consider are:


Line of sight. Are you going to have a good view of the room while sitting at the desk?


line of sight, seating, arrangement, chart, plan, classroom, class, decor, first days, school. primary, middle, upper, set up, teacher, teach, education, blog


Are you going to teach from the desk? If you have a laptop that can only be plugged in at the desk, then you may have to use this your base but may want to invest in an iPad you can mirror your device to so you’re free to roam the room.


Where will you store your papers that need marking and teaching materials?


Once your teacher desk is set up you can then get a clear idea of how to set up the student’s desks.


STUDENT DESKS

Who do you want to be the focus of the class?
  • Teacher-Centered Class: If your class is going to be a lecture- and presentation-centric, use a configuration where all students can see you and the lectern.
  • Learner-Centered Class: With these classes, student discussion and group work are paramount. Find a seating arrangement that encourages students to interact with one another.
  • Both: Many educators adhere to the belief that a balanced education has a healthy mixture of both teacher-centered presentations and student-based discussions and work. Look for seating layouts that are flexible and functional.
How do you want the class to interact?
  • Minimal: Interaction flows from the teacher to the student. Student-to-student discussion is scarce. Testing and individual work also dominate the class.
  • Small Groups: Students interact in pairs or small groups.
  • Large Groups: Students engage in group discussions and lessons with the entire class.


Things to consider:


How do you prefer students to work?


- In groups.

- in pairs.

- independently

- combination of all three


Your decision making will depend on how well behaved your students are, which you won’t know until you get to know them. You may wish to start off in groups and then move to independent learning later. Don’t be afraid to mix it up each month but try not to change the arrangement too often as this can cause students stress.


Here are my favorite arrangements for the best teaching activities.


Clusters

Most Common Desk Arrangements

Clustering the desks into small groups promotes student-to-student interaction. Students develop skills such as communication, problem solving, collaboration, and more in this arrangement. These clusters offer safe and comfortable environments for students to share ideas. Small groups with no more than 4 students. Remember the number of students is important because you may want to switch it up to do pair work. 


Good for: group works, team building, pair work within groups and behavior management and post scoring.

Bad for: chatting and some students may not see the board as easily as others. (Be strategic with who you place in each group and move those talkers around).This comfort, however, also lends itself to off-task behavior and a large increase in noise level and distractions. 


Rows

Most Common Seating Arrangements


The rows configuration is the most common classroom arrangement. This type of setup complements class structures that revolve around teacher-based instruction and presentations. Old fashioned yes but sometimes necessary for a class with behavior problems. All students face the front and everybody can see the board.


Good for: Students are more focused on coursework and independent assignments. They are also less likely and/or able to cheat with this layout. Teachers - you can see everybody all the time and can nip those behavior problems in the bud right away. Also good for keeping those struggling students near the front so you can help them out easily. Pair work is easy in this set up if you keep the numbers in each row even.

Bad for: Though this seating arrangement can be used with any class size, large classes may often see uneven levels of interaction as students in the front row will participate more while those in the back may lose focus.


Stadium


Alternative Classroom Configurations
A variation of the classic row configuration and runway, desks are grouped in clusters but all facing the same direction. Like runway, this layout is best suited, teacher-centric classes.

Conclusion

When your classroom setup is in harmony with your teaching style, your students, and the space and furniture you have to work with, the benefits can be endless. But, when it’s not, it can be detrimental.


Many factors contribute to determining the most effective classroom seating arrangement. With some of these factors changing daily (and sometimes even hourly), it’s important to have a configuration that can be flexible to accommodate classroom variety.

Friday, December 20, 2019

Time Saving Tips For Teachers

There never seems to be enough time, right? Between our lesson plans, gathering materials, teaching, grading, classroom management, and scores of other tasks, we teachers are pretty much maxed out. Even if we find time to do everything that we’re supposed to, we feel like we’re not really doing them all that well. How can we maximize our time and classroom management? Here are some handy tips that might help you save time and accomplish more throughout your day.
Clear your laptop
If you clear your computer and organize your digital workstation, you could gain back time that would be otherwise squandered.
Delete documents you don’t need anymore, transfer important files to a cloud service, and make an organizational system that works for you.
Organize your desk
Piling things on your desk is a sure way to lose them.
Therefore, declutter and organize your physical space:
– Use shelves or labeled bins for everyday submissions.
– Use an inbox/outbox system for permission slips, notes from home, and other things that come to your desk.
– Each item on your desk should have its own place; make sure you put it there every time.
Manage papers efficiently
Are you overwhelmed with the piles of tests, memos, attendance forms, and letters? If so, it’s time to bring some order.
– Assign a file drawer for every subject you teach.
– Use colored files to classify papers by topics, like red for quizzes and tests and blue for lesson plans.
– If you haven’t used the paper in six months or more, recycle it.
Grade papers effortlessly
Grading student papers is one of the most tiring and tedious tasks for teachers. Pointing out each mistake on a student’s writing can be so time-consuming. Instead, focus on the errors that are directly related to the lesson. Then, create a document with frequently-used comments you can copy and paste. That way, you will automate the process and save time and energy.

Not every detail needs your excruciating attention. Instead, focus on one or two major aspects where you’d like to give feedback. This will increase your grading speed. Remember: Every single paper-and-pencil task a student completes does not have to be graded. Allow students to self-grade or peer-grade when appropriate.

Plan your lessons online
Planning your lesson is another activity that takes a lot of effort. However, it doesn’t have to be like that if you use lesson planning sites which are great time-saving tools.
Use CommonCurriculum or Planbook to create lessons easily and quickly. Not only can you organize lessons around Common Core standards, but you can also design custom schedules for every class and allow students and other teachers to view your plans online.
Use the 2-Minute Rule
When you need to tackle tasks that actually aren’t difficult to do, you tend to procrastinate and wait for the last minute to start. An efficient way to crush your procrastination is to apply the 2-Minute Rule.
The rule says that if a task requires less than two minutes to complete, then do it right away. Don’t wait to answer your email or file a document.  Instead, embrace the 2-Minute Rule and boost your productivity.
Plan your day
To make the most of your time and use it wisely, it’s crucial to plan your day. Spend a few minutes after school each day jotting down what you’ll do tomorrow. Use an agenda with time slots to schedule every task at the appropriate time. That way, you will use your time more efficiently and get more things done. Without proper planning, you won’t be in control of your time so you’ll be at the mercy of other people’s schedules.
Eliminate all distractions
Nowadays there are many distractions, such as social media notifications, emails, text messages, or incoming calls that pull teachers away from their plans and waste precious time.
For that reason, limit your time on social networks or check your emails only twice a day. Also, put your smartphone on Airplane mode while working and avoid unpleasant interruptions. Everything can wait until you finish your job.
Automate some tasks
Sometimes you don’t need to work harder to be more efficient, just work smarter. This means you can automate some tasks and save some time.
For example, you probably send many emails to parents and students on a variety of matters. Instead of squandering your time writing the same email over and over again, create some templates you can quickly revise and compose emails in no time at all.


Go digital
Printing and copying class materials take a lot of your time. Besides, it requires time to store all the papers and find one when a student needs it.
That’s why you should consider going digital and using cloud services for storing your documents. That way, you will always have a ready copy that your students can download and more importantly you will save time and drawer space.

Create templates for materials you create regularly. For example: store on your computer a lesson plan template, then use "save as" to name the lesson plan.
Learn to delegate
Learning to delegate is a crucial skill that every teacher should learn. Use tools that can give you a hand and work more productively.
You don’t have to do everything yourself. Don’t shy away from using aides, paras, or even asking parents or students to lighten your load. There are always some simple tasks that they can assist you with and many are more than happy to do so. As a result, you’ll avoid burnout and feel more energized

Take advantage of your mornings.

 Your mind is the freshest in the mornings before school begins. Take the extra time to organize your tasks and materials and time to think through your day. It’ll streamline your productivity.

Learn to say no.

Administrators, teachers, parents, and students all make requests of us. But believe it or not, the world will still function if we have to turn down a few. Focus on your priorities, and feel the freedom to dismiss the rest.


We have a seemingly interminable list of to-dos hanging over our heads throughout the school year. If we can take steps to whittle down that list and control how we use our time, then we might have some breathing room to realize that we are doing a great job. Consider applying some of these tried-and-true teacher time-saving tips as you hit the ground running this school year!
Monday, December 2, 2019

Ways to Check Students Understanding

The ultimate goal of teaching is to do just that – teach, not stand up in the front of the room and talk. But sometimes it’s easier to talk than to teach, as we all know, especially when we need to cover a lot of material in a short amount of time. We hope students will understand, if not now then before test time, and we keep our fingers crossed that their results will indicate we’ve done our job.
The problem is, we rely on these tests to measure understanding, and then we move on. Few of us take the time to address weaknesses and misunderstandings after the tests have been graded, and by that time it’s too late for students to be interested. This means we need to rethink how we approach assessment during class.
The most effective way to test student understanding is to do it while the lesson’s still going on. Asking students to fill out a questionnaire and then correcting misunderstandings during the next class period won’t work because students have already moved on. You’ve got to take advantage of the moment. If you hope to spend the majority of your time getting through to students, and not just talking, then understanding must be measured and dealt with as soon as the first frown appears on a face.
Here are a few in-class tips to get you started:

Give them a Yes/No question.

Check for understanding by asking students to flash a red piece of construction paper for no (they need a little more explanation) or a green piece of construction paper for yes (they get it and are ready to move on).  Alternatively, laminate squares of red and green construction paper and glue them back to back to large popsicle sticks to make paddles for your students to show.  So, of course, it’s surprising when several students later admit that they’re lost. To help students grasp ideas in class, ask pointed questions that require students to use their own prior knowledge.

Ask students to reflect.

During the last five minutes of class ask students to reflect on the lesson and write down what they’ve learned. Then, ask them to consider how they would apply this concept or skill in a practical setting.

Use quizzes.

Give a short quiz at the end of class to check for comprehension.

Ask students to summarize.

Have students summarize or paraphrase important concepts and lessons. This can be done orally, visually, or otherwise.

Hand signals.

Hand signals can be used to rate or indicate students’ understanding of content. Students can show anywhere from five fingers to signal maximum understanding to one finger to signal minimal understanding. This strategy requires engagement by all students and allows the teacher to check for understanding within a large group.

Response cards.

Index cards, signs, whiteboards, magnetic boards, or other items are simultaneously held up by all students in class to indicate their response to a question or problem presented by the teacher. Using response devices, the teacher can easily note the responses of individual students while teaching the whole group.

Four corners.

A quick and easy snapshot of student understanding, Four Corners provides an opportunity for student movement while permitting the teacher to monitor and assess understanding. The teacher poses a question or makes a statement. Students then move to the appropriate corner of the classroom to indicate their response to the prompt. For example, the corner choices might include “I strongly agree,” “I strongly disagree,” “I agree somewhat,” and “I’m not sure.”

Think-pair-share.

Students take a few minutes to think about the question or prompt. Next, they pair with a designated partner to compare thoughts before sharing with the whole class.

Choral reading.

Students mark text to identify a particular concept and chime in, reading the marked text aloud in unison with the teacher. This strategy helps students develop fluency; differentiate between the reading of statements and questions; and practice phrasing, pacing, and reading dialogue.

One question quiz.

Ask a single focused question with a specific goal that can be answered within a minute or two. You can quickly scan the written responses to assess student understanding.

Socratic seminar.

Students ask questions of one another about an essential question, topic, or selected text. The questions initiate a conversation that continues with a series of responses and additional questions. Students learn to formulate questions that address issues to facilitate their own discussion and arrive at a new understanding.

3-2-1.

Students consider what they have learned by responding to the following prompt at the end of the lesson: 3) things they learned from your lesson; 2) things they want to know more about; and 1) questions they have. The prompt stimulates student reflection on the lesson and helps to process the learning.

Ticket out the door.

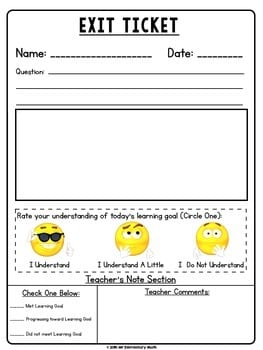
Students write in response to a specific prompt for a short period of time. Teachers collect their responses as a “ticket out the door” to check for students’ understanding of a concept taught. This exercise quickly generates multiple ideas that could be turned into longer pieces of writing at a later time.


Download this cute freebie to create these exit tickets. Students can write the question of the day at the top and turn in their responses on the way out.

Journal reflections.

Students write their reflections on a lesson, such as what they learned, what caused them difficulty, strategies they found helpful, or other lesson-related topics. Students can reflect on and process lessons. By reading student journals, teachers can identify class and individual misconceptions and successes.

Formative pencil–paper assessment.

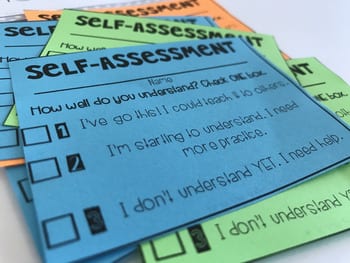
Students respond individually to short, pencil–paper formative assessments of skills and knowledge taught in the lesson. Teachers may elect to have students self-correct. The teacher collects assessment results to monitor individual student progress and to inform future instruction. Both student and teacher can quickly assess whether the student acquired the intended knowledge and skills. This is a formative assessment, so a grade is not the intended purpose.


Download this free resource and print up a stack of them in different colors for different subjects. Pass them out as exit tickets to plan for the next lesson period. 

Misconception check.

Present students with common or predictable misconceptions about a concept you’re covering. Ask them whether they agree or disagree and to explain why.

Analogy prompt.

Periodically, present students with an analogy prompt: “the concept being covered is like ____ because ____.”

Practice frequency.

Check for understanding at least three times a lesson, minimum.

Use variety.

Teachers should use enough different individual and whole group techniques to check understanding that they accurately know what all students know. More than likely, this means during a single class the same technique should not be repeated.

Make it useful.

The true test is whether or not you can adjust your course or continue as planned based on the information received in each check. Do you need to stop and start over? Pull a few students aside for three minutes to re-teach? Or move on?

Peer instruction.

Perhaps the most accurate way to check for understanding is to have one student try to teach another student what she’s learned. If she can do that successfully, it’s clear she understood your lesson.

Give a thumbs up/ thumbs down.

Sometimes all it takes is a quick thumbs up or thumbs down to make sure your students are all still on board. Stop frequently to check-in and have your students hold them up high so you can take account. 

Do a Quick Write.

Ask just one question and have students jot a quick paragraph on index cards to show that they understand. Have them share their answers with a partner or collect the cards to review for the next day. 

Post your name on the stop sign.

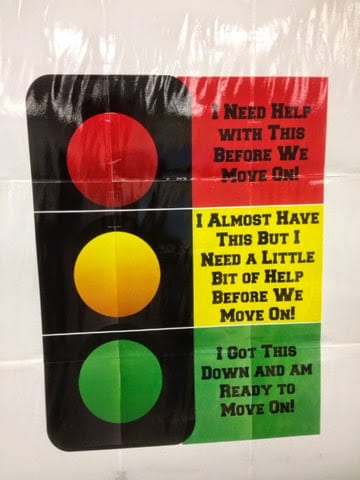
This teacher blogger asks students to check for understanding by writing their name on a post-it, then attaching it to the stoplight on the appropriate color. She then groups students who need re-teaching and advises students who are ready to move on. 

Draw a T-chart.

Ask your students to tell you five (or whatever number you think is sufficient) things they learned from the lesson. Have them make a T-chart and on the left hand side write a fact or opinion, and on the right side give evidence to support their fact or opinion. 

Display mini flip charts. 

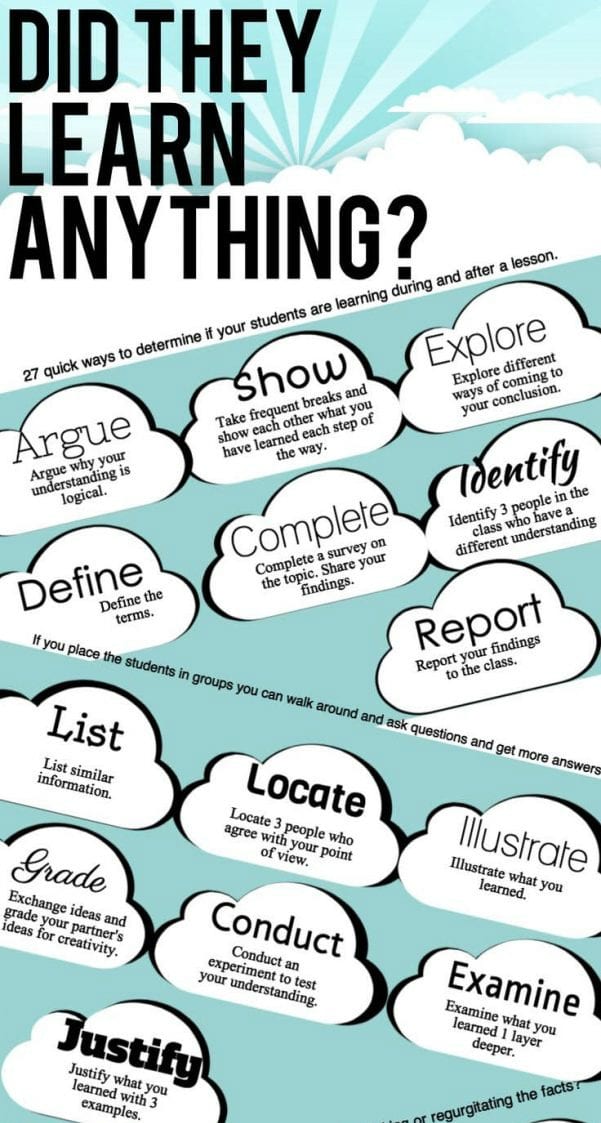
Reference this chart. 

SOURCE: Mia MacMeekin
This amazing infographic shows all kinds of imaginative ways to check for understanding. Print out a copy and display in your classroom for inspiration.